Facebook Reviews: What REALTORSⓇ Need To Know
- Facebook Reviews: What REALTORSⓇ Need To Know - October 25, 2017
- The Art Of Negotiation - October 18, 2017
- The Top Agents Daily Checklist - October 11, 2017
 As of June 30, 2017, Facebook has over 1 Billion daily active users, with 400 new users signing up every minute. Facebook is the largest social network around and it’s fairly safe to say that the majority of your clients are on it frequently.
I was looking at some recent statistics about Facebook regarding users’ habits and brand social media strategy. Two statistics that stood out for me were:
- 42% of Customer service responses are attended to within 60 minutes. People relate quick response to good customer service! (Source: SproutSocial)
- 71% of people who have a good social media experience are likely to recommend it to others (Source: Ambassador)
With that in mind, when looking at your brand as a REALTORⓇ, one way to give you the edge over your competitors is with Facebook Reviews. Facebook Reviews give REALTORSⓇ an opportunity to increase credibility and transparency with their past, current and potential clients. It is also one of the most overlooked aspects of online marketing.
Turning a Negative into a Positive
Why don't we start with the elephant in the room. From time to time, you may receive a negative review. Facebook only gives you one option, you can show all reviews or turn off all reviews. You aren’t able to delete or hide individual ones and you can't organize them by having the best showing at the top. Only the person that left the review can edit or remove it. Not to worry though, if you are actively building your positive review base, they will far outweigh any negative ones you may receive. It’s important you respond immediately, apologize politely and inform them you would like to speak privately to resolve the matter. This will show others you’re professional and caring and it goes a long ways towards reversing the negativity.
Building a Positive Real Estate Brand
The most efficient way to receive positive reviews and increase your online credibility with your clients, is by regularly asking satisfied customers if they will leave a Facebook review for you. Make this a standard part of your marketing plan and provide them with directions on how to do this. Most people who enjoyed working with you, will be more than happy to help you out and spread the word - just ask!
Simple instructions are as follows:
- Go to the Facebook Page you are reviewing
- Click on the Review Tab
- Enter a Star Rating and comment
- Mark audience as Public
- Click on Done
Setting Up the Review Tab
Turning on the reviews section in Facebook, lets anyone logged into Facebook leave a review on your Page, see your Page’s star rating and see reviews shared with the public.
To turn reviews on for your Page:
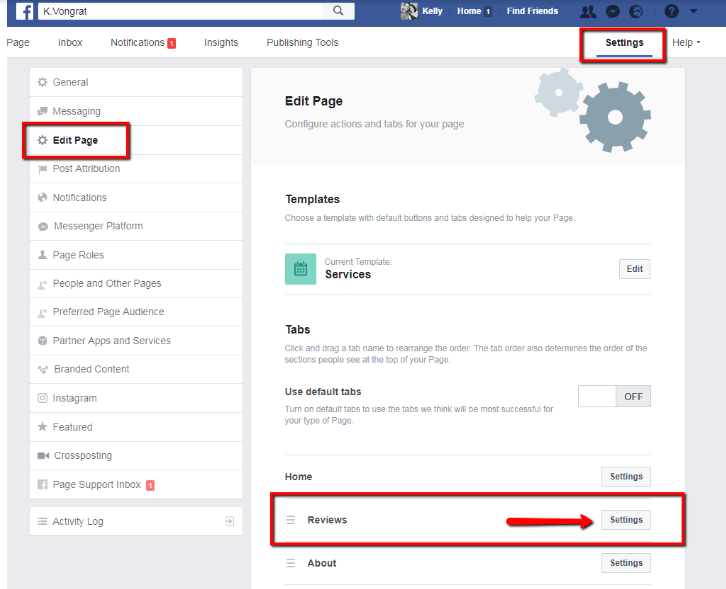
- Click Settings at the top of your Page
- Click Edit Page in the left column
- Scroll down to the Reviews section and click on the settings button
- Toggle to On
**If you don’t see a Review section
-
- Click Add a Tab
- Click Add Tab next to Reviews
To turn reviews off for your Page, follow the same steps, but toggle the Reviews section to off. If you do decide to turn them on again, remember, all previous reviews will still be there.
How To Share Your Page Within Facebook
Social Media is all about word-of-mouth. The more people talking about you and sharing the experiences they have had with you, the more others will want to work with you. Make it easy for your clients to get the word out.
From inside Facebook, share your page by using a private message.
On a Desktop or Laptop
- Click the Share Button underneath your cover image
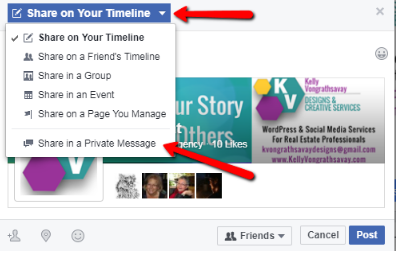
- Click on the down triangle beside Share on Your Timeline for more options
- Select Share in a Private Message
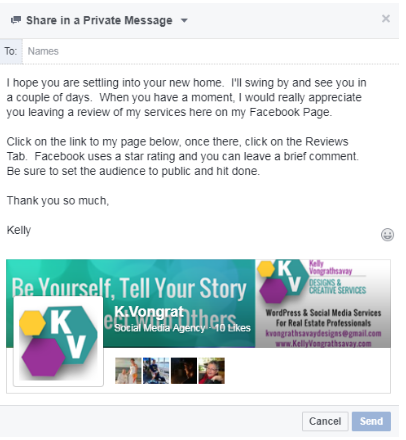
Another box will now pop up which will have your page automatically linked in the message. Type in the name of the person you are wanting to send the message to, ask for a review and give brief instructions on how to do that. When they next log into Facebook it will be in their notifications.

If you are on a mobile device, you will need to share using Messenger.
- Go to your Facebook page
- Click the 3 dots on the top right side
- Select Share in Messenger
You may also want to publish a post on to your Facebook Page, pointing out the review tab and asking clients to spare a minute or 2 giving you a review.
Outside of Facebook, email or give them a printout of directions along with screenshots and telling them how much you would appreciate them sharing their experience working with you. Include a link in your email signature that takes them directly to your Facebook Page Review Tab.
The direct link to a Pages Review Tab is www.facebook.com/YourFacebookUsername/reviews/.
Respond to Reviews
When you do receive a review, make sure you reply with either a Like or posting a Thank You comment to the client. Show them you appreciate the time they took to leave one for you and show others you care and this is an important part of your business.
Click here for the bonus item: Daily Facebook Activity checklist
Strength and courage,
Wade
Please share this post using the buttons below...
https://plus.google.com/u/0/113259707478722993209/posts/2dycZ4ekEvi


FIRST 2 CHAPTERS FREE
My book, The Lazy Realtor, is available in Paperback or Kindle format, on Amazon. You can preview it here and I’ll even include these bonus items:

Phone: (250) 212-8220 | Wade@agentsboost.com


